.png?fit=crop&w=1280&h=560&fm=avif)
Hello! I'm Hasshi, a UI designer at Liberogic Inc.
My recent concern is that I'm not making much progress on creating a new LP (landing page) for my accessibility service.
Thankfully, the CEO, who is in charge of designing our company website, is extremely busy with other matters. But at this rate, we won't be able to move forward...

"Okay, let's at least create a rough draft here to make the president's review a little easier!"
It all started with that idea,Rapid LP production using AI (Gemini) and design automation tool (FigmaMake)This time, I will share the entire process and my honest thoughts from a designer's perspective!
Our goal this time: to get the president to make some "red comments" on the draft!

It's impossible to make something perfect from the start! Yes! First of all, it's important to throw something that the president can easily comment on, that's for sure!
The complete process for creating an LP at lightning speed (even faster once you get used to it!)
Here's the actual time allocation for the production flow we tried out this time: The part that took the most time was the "repetition" part, which was about improving the accuracy of the design.
- 【analyze】Gemini-sensei, what do you think of this LP?(15 points)
- [Text generation]Have Gemini create the landing page text including the improvements(15 points)
- [Prompt Creation]Let Gemini cast the "magic spell" you want to cast on FigmaMake(5 points)
- [Design generation]FigmaMake, I ordered it first!(5 points)
- [Repeat Loop]Improving accuracy through a round-trip between analysis and generation(1.5 hours)
- Figma-izationImport to Figma with the Html to Design plugin(5 points)
- Figma FixesFinal adjustments to layout issues(30 minutes)
Let's take a closer look at each step!
STEP 1: [Analysis] Gemini-sensei, what do you think of this LP? (15 minutes)
First, we have Gemini read our existing accessibility pages and get honest feedback.
[Example of prompt for Gemini]
Please analyze the landing page for web accessibility at the URL below and list the advantages and disadvantages.
The analysis results came back in just a few seconds: "'There are no case studies or customer testimonials, so it's hard to imagine the specific benefits of implementing the service'... Wow, that's so accurate it really hurts! But it's something I couldn't have said myself, so thank you, Gemini!" They were able to accurately put into words the issues I had vaguely sensed.

Well, first of all, let's understand the current situation. I created this page, but anyway, I'll have Gemini-sensei point out anything I don't notice myself!
STEP 2: [Text Generation] Have Gemini create LP text including improvements (15 minutes)
We will copy and paste the analysis results from STEP 1 and ask you to create a text that includes improvement suggestions.
[Example of prompt for Gemini]
Based on the results of the analysis above, please create a text structure proposal for the web accessibility landing page. (Omitted) Please clearly mark any newly added elements as [Sample Text].
When you include specific text like, "Customer Testimonial Sample: XXXX Co., Ltd.: Inquiries via the website increased by 1.5 times!", it instantly becomes more like a landing page. Just this alone makes you feel like you've done your job.

Okay, I'll just hand over the list of criticisms I received to Gemini and have them turn it into something cool. This is the best use of AI! ...Oops, I need to make sure they mark it as "[Sample Text]" so I don't get confused later. I'm a bit quick to jump to conclusions...
STEP 3: [Create a Prompt] Have Gemini cast a "magic spell" to cast on FigmaMake (5 minutes)
You will be asked to provide the text structure proposal you created in STEP 2 and the image of the design you want to create, and have an English prompt generated for FigmaMake.
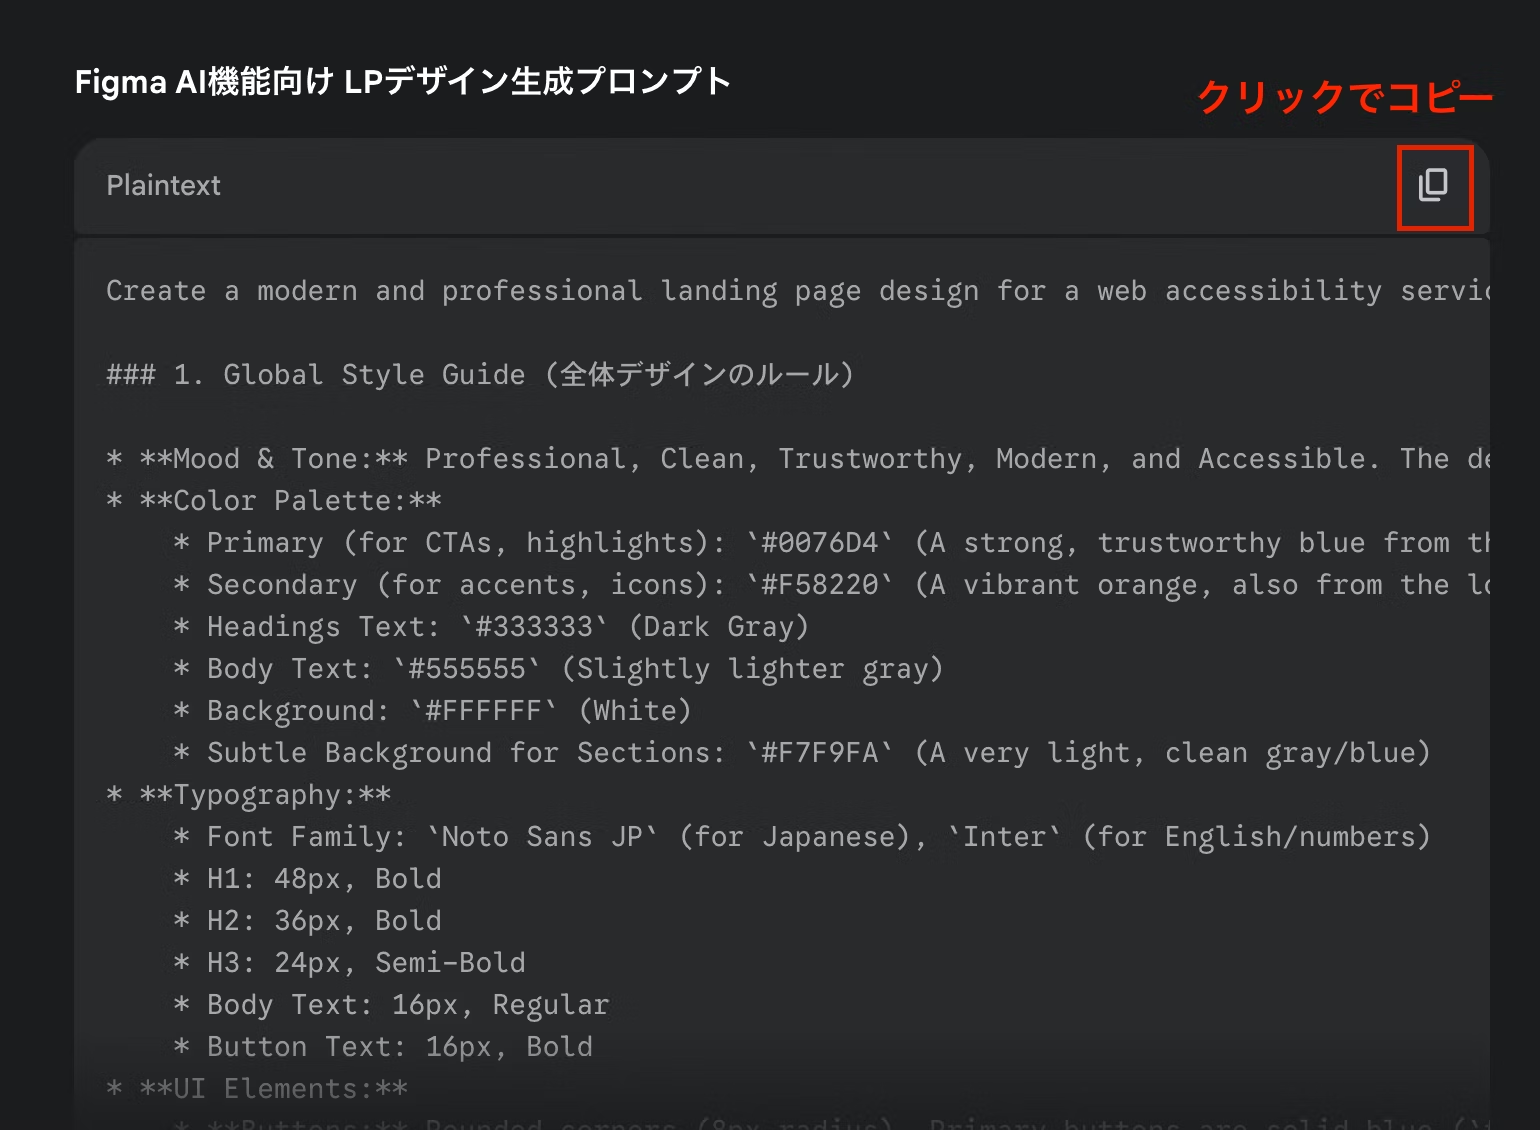

Once the text is done, it's time to design! That's the most fun part! But before that, I have to create a "prompt" for FigmaMake. My broken English isn't good enough to get my point across, so I'll leave this to Gemini-sensei. I'm counting on him!
STEP 4: [Design Generation] FigmaMake, leave the rest to us! (5 minutes)

Now, copy and paste the magic spell and hit enter! ...or so you say. Maybe I'll get a divine design in one go? ...Maybe not. Or maybe? This excitement is a bit like gacha and it's fun.
Copy and paste the generated prompt and click the Generate Design button. These few seconds of waiting are surprisingly nerve-wracking. And then the first design appears.
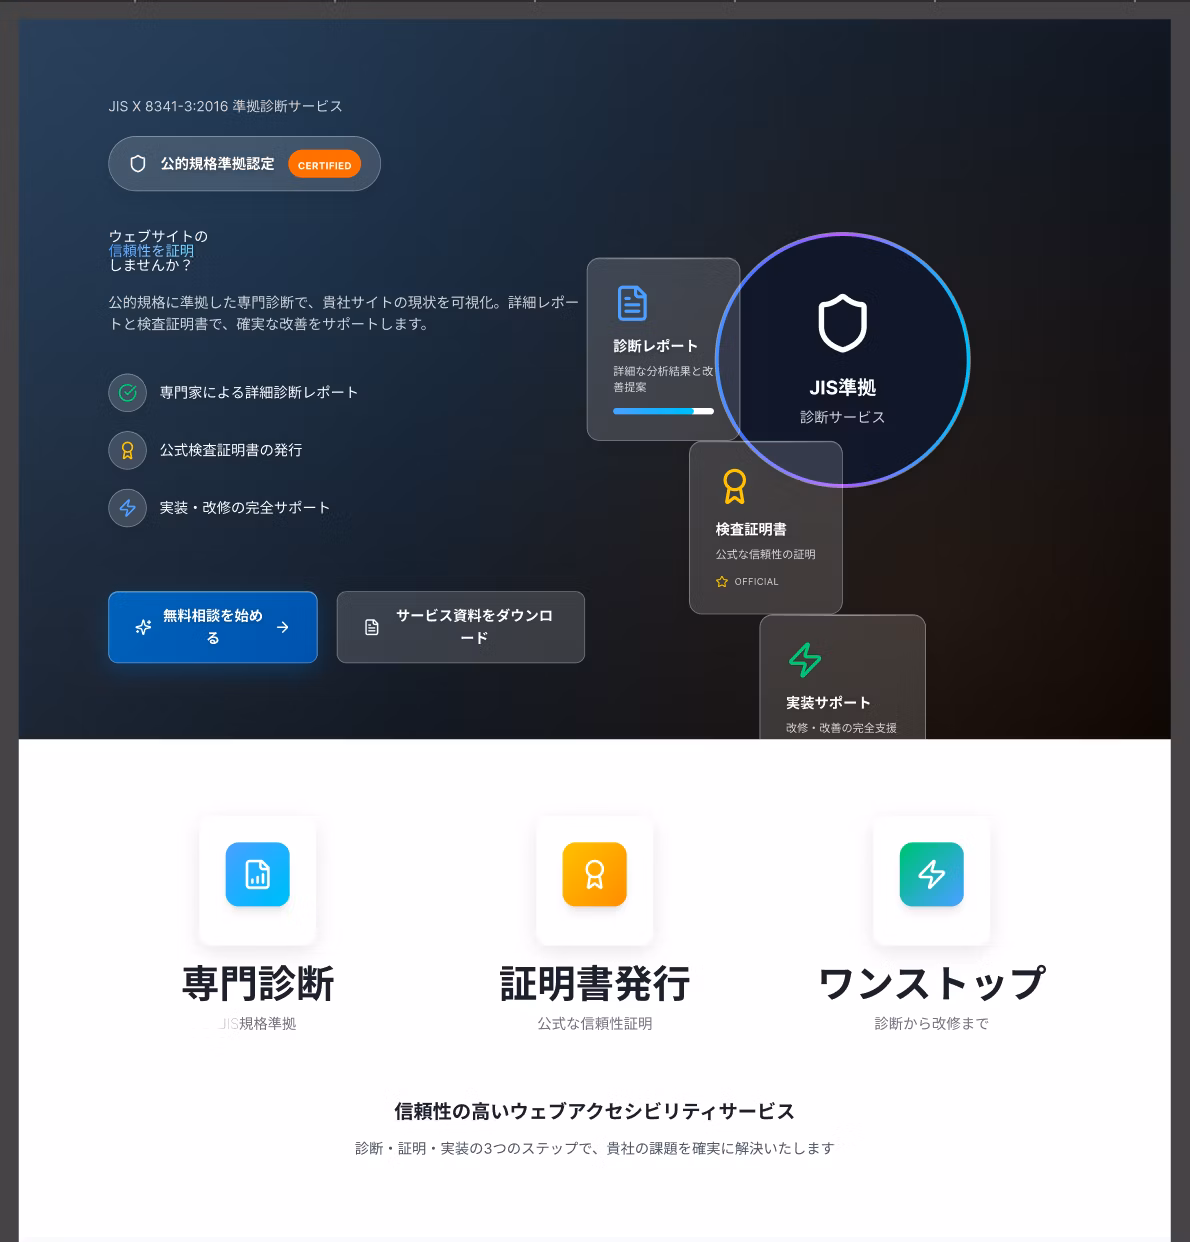
Wow, it's done! But it's still a bit simple... We'll continue to make adjustments to the design and wording.
But, well, this was where the real action began.
STEP 5: [Repeat Loop] Improve accuracy by going back and forth between analysis and generation (1.5 hours)
From here, it was time for brainstorming with the AI. While looking at the design generated by FigmaMake, we consulted with Gemini about what we wanted to improve, and worked steadily to improve the prompts.
"Oh no, not that way!" I muttered to myself louder. My voice probably echoed around the office. But strangely, I started to enjoy this rally more and more.

Yes, it didn't go over well on the first try! I knew it would! But I had some hope! This is where the real action begins, a three-legged race with the AI. Is it like I'm the director and Gemini is the coach?
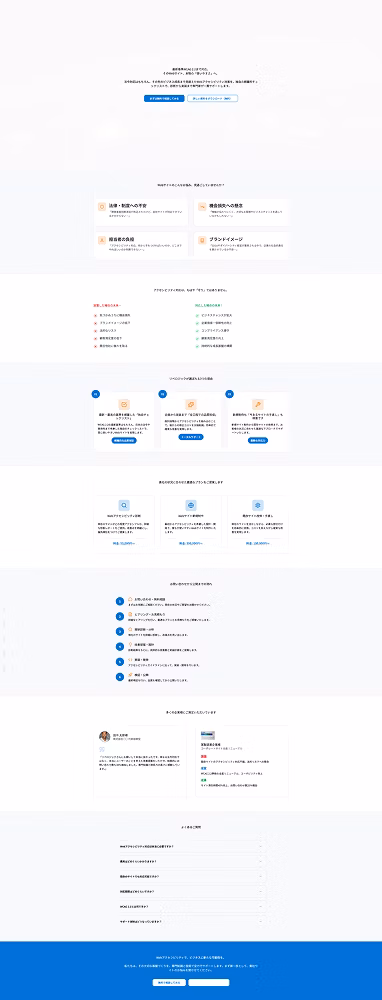
And here is the final output

It's gotten a lot better than the first drawing. However, it's a pain to erase or add unnecessary parts (probably because instructions are translated from Japanese to English, so the intention is often not conveyed properly...).
I thought it might be impossible to do any more on FigmaMake, so I resorted to the brute force method of converting it into Figma data and then making corrections.
STEP 6: [Figmaize] Import into Figma with the Html to Design plugin (5 minutes)
Once the design direction has been solidified to a certain extent, it's time to transfer the data to Figma. The steps are listed below.
- The design generated by FigmaMake is first published as a web page.
- Launch the Figma plugin "Html to Design".
- Enter the URL of the published FigmaMake and execute the import!
All you need to do is use the plugin "Html to Design." Copy and paste the URL of the page you published in FigmaMake and click the button. That's all it takes to convert the web page into a layer in Figma. What a convenient world we live in.
FigmaMake Launched
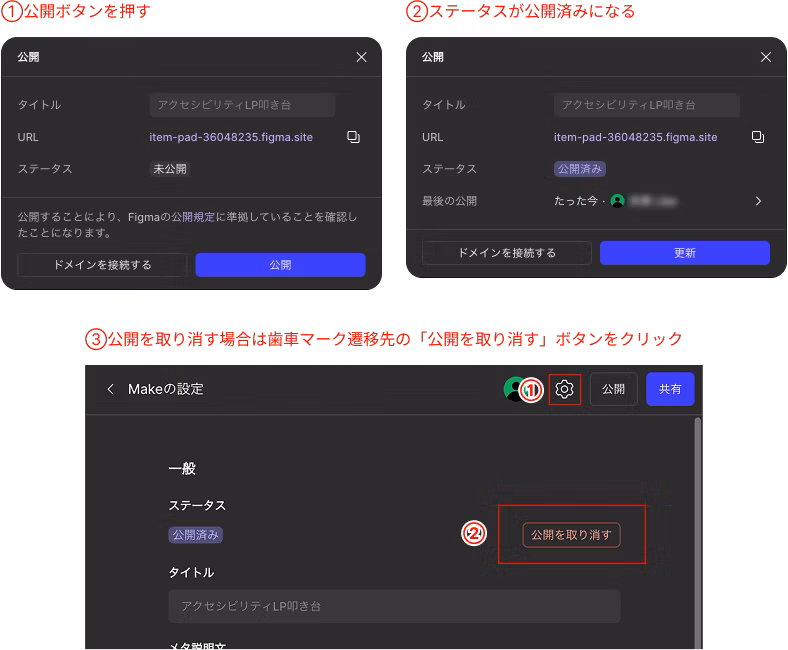
First, publish FigmaMake. Click Publish and the status will change to Published.
Launch the Figma plugin "Html to Design", enter the URL of the FigmaMake you published, and then import!
Launch the plugin and paste the URL you just obtained. Then click the Import button and you're done!
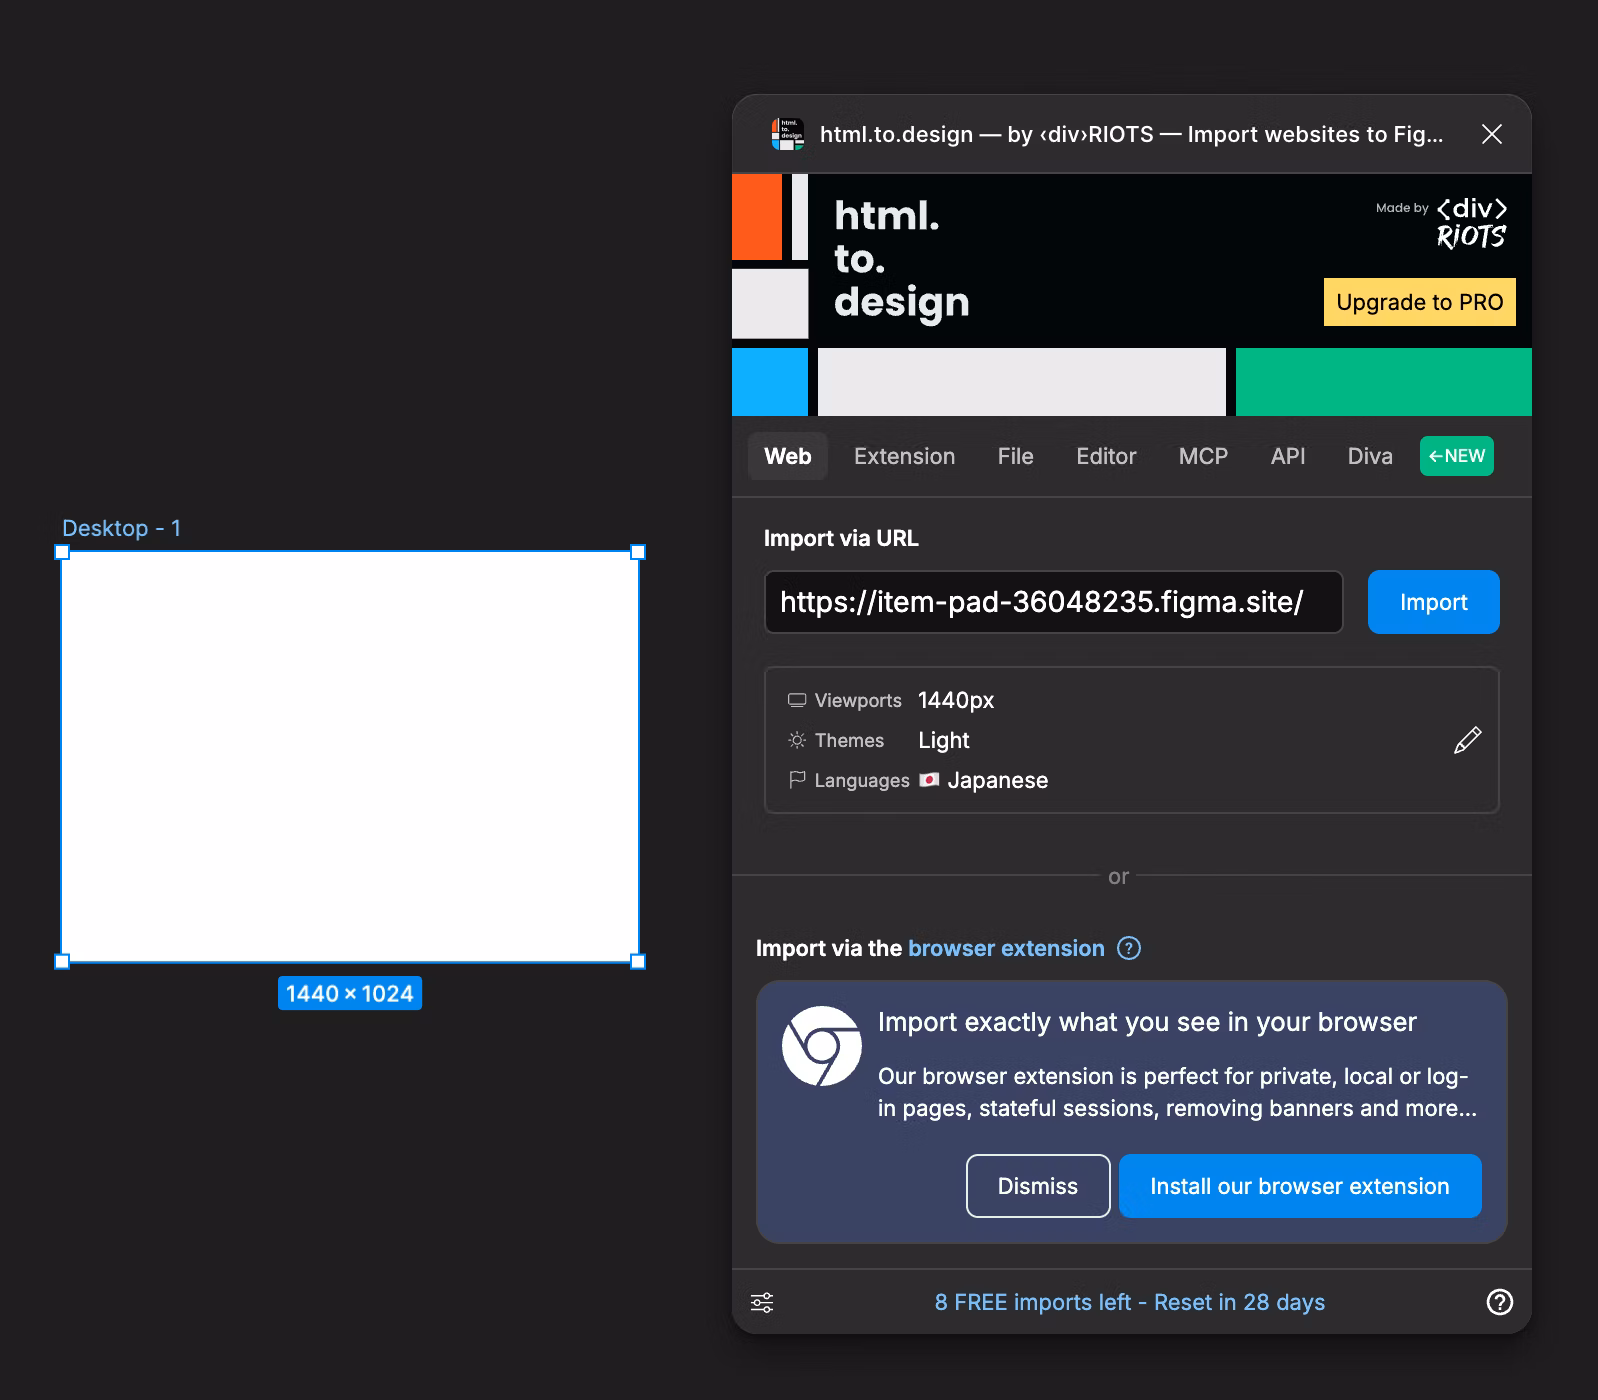
After a few minutes, the output design will be displayed on Figma.
Finally, change the public status to private
Once you've completed the steps, unpublish the post to return it to its private state.
Concerns
Currently, there are no functions to set a password for the public state or to create a development environment, so if you use it to renew a company website, you need to be careful about information leaks.
Basically, I don't think it will have any impact if you are creating content that is limited to your own company or if you are creating a rough draft using dummy information, so I think it's best to use it depending on the project (never use it for projects that do not allow external distribution).

Ok, this is starting to look pretty good! Now it's time to bring in my home turf, Figma! Sorry to have kept you waiting, buddy!
STEP 7: [Figma correction] Final adjustments to layout issues (30 minutes)
The newly imported data is still rough around the edges, with mysterious groupings and text boxes spilling over, leaving plenty of room for improvement.
From here on, it's all about steady revision work: re-running auto layout, recomposing disjointed elements into components, adjusting the overall margins... This little bit of effort significantly improves the quality of the design and turns it into a "proper rough draft."
Here is the finished product
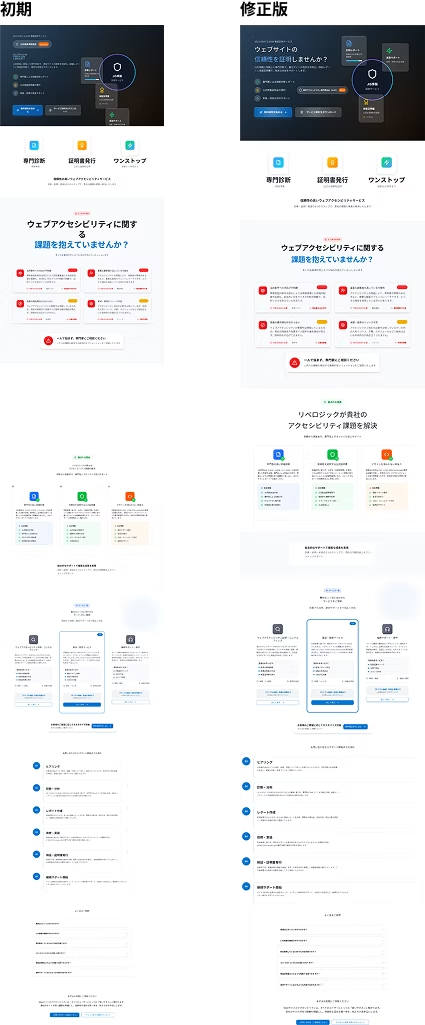
The granularity of the design decreases as you go down the LP, but I'm not sure if this is just an unavoidable aspect of the AI or if my instructions are poor... I'll continue to experiment with various options.

Import, and... Yeah, the layout is more lively and wild than I expected! Well, that's the result of the AI's hard work. Now it's time to show my love by tidying it up nicely.
Summary: What I learned from creating it: the key points of "AI collaborative design"
What I realized through this production flow is that AI is not a "magic wand" but an "excellent partner."
- The time-saving effect of creating a rough draft is enormous:It's much faster than staring at a composition plan from scratch.
- The key is the trial and error loop:Creating good designs requires patience and repeated dialogue with AI.
- The final touch:Quality depends on the designer not just blindly accepting what the AI has created, but finishing it with intention.
By the way, when I timidly showed this draft to the president..."Oh, that's interesting! This will make it easier to move the discussion forward! Just having a starting point makes a huge difference, thank you!"That's what they say.

Yesssss! It was worth the effort...! The beer tastes good tonight!
That's all for now! The actual LP part will be released as the second half after the president has finished adding his red ink!
Why not try creating new designs in collaboration with AI?

UI design is updated every day! I'm also thinking about how to incorporate accessibility into LP design. I've been away from markup lately and I've been thinking, "Should I improve my JS too?" I love Takumi Kitamura!
Hasshi
Web designer / Joined in 2018 / Kokoro is still a budding designer