Kakeru-san, Hasshi-san, and others are using Supabase to do some interesting development. Unlike the waterfall-style development we've seen up until now, I can hear all sorts of things about defining functional requirements from the UI, but I can't let myself be outdone!
So, this time I will create a simple memo app and summarize the steps to connect Supabase and Prisma and save the data in a database as a memo.Gemini CLII'll use it too!
Environment: Next.js
We will not use Supabase's Auth, Realtime, or RLS, but will use Prisima to access database functions from the API. Since database tables can be treated like Javascript/Typescript objects, we thought it would be easy for front-end engineers to write code that is familiar to them.
Prisma
Prisma ORM is an ORM (Object-Relational Mapping) library that can be used with TypeScript and JavaScript.
Simply put, it is a tool that allows you to operate a database without writing SQL using methods defined in objects of a programming language.
Furthermore, Prisma automatically generates types from the database schema, so if you try to manipulate a column that does not exist in the database or data of the wrong type, you will be notified by a compilation error!
Supabase
Supabase is a full-stack backend service gaining traction as an open source Firebase alternative.
- Highly scalable and reliable based on the PostgreSQL database
- Real-time database functionality automatically notifies you of data changes
- Supports multiple authentication methods (email/password, social login, phone authentication, etc.)
- File storage function for efficient management of large files
- Rapid development with automated generation of RESTful and GraphQL APIs
- Extensive developer tools and SDKs make setup and deployment easy
I want to emphasize the steps to connect to Supabase,Gemini CLIThis is a very convenient product that will make you cry! I'm so glad my company uses Google Workspace!

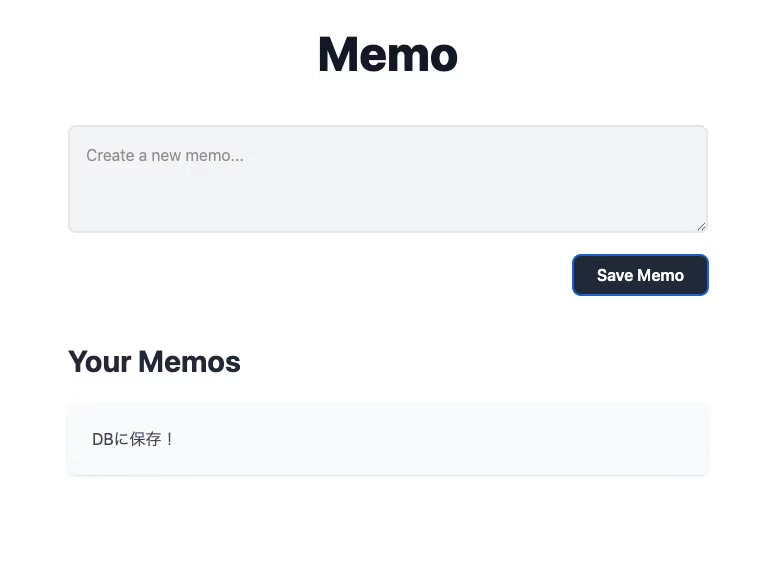
I want to create a memo function using Supabase and Prisma. First, create page.tsx.
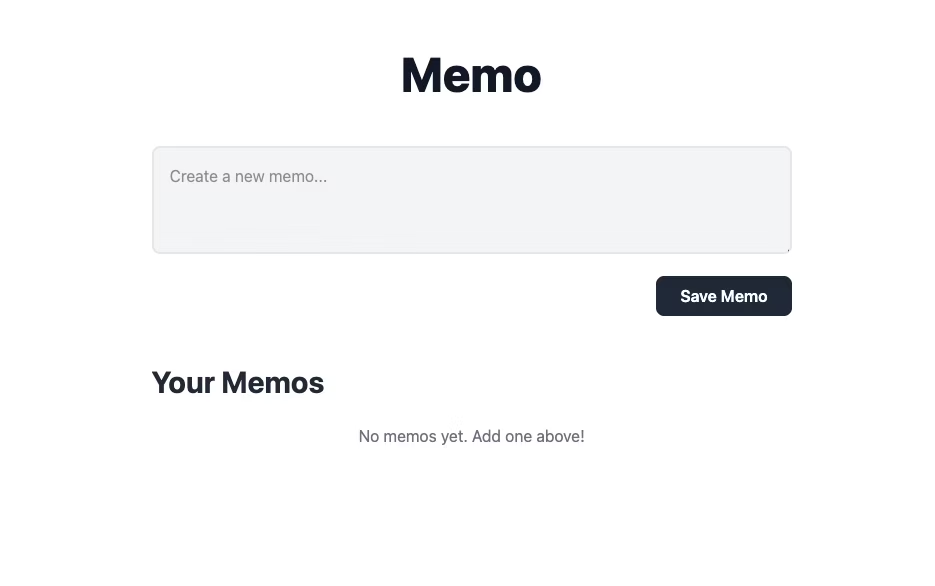

Okay, then, I want to set it up so that when I press the Save Memo button, the content I entered in the textarea is added to the list in Your Memos.
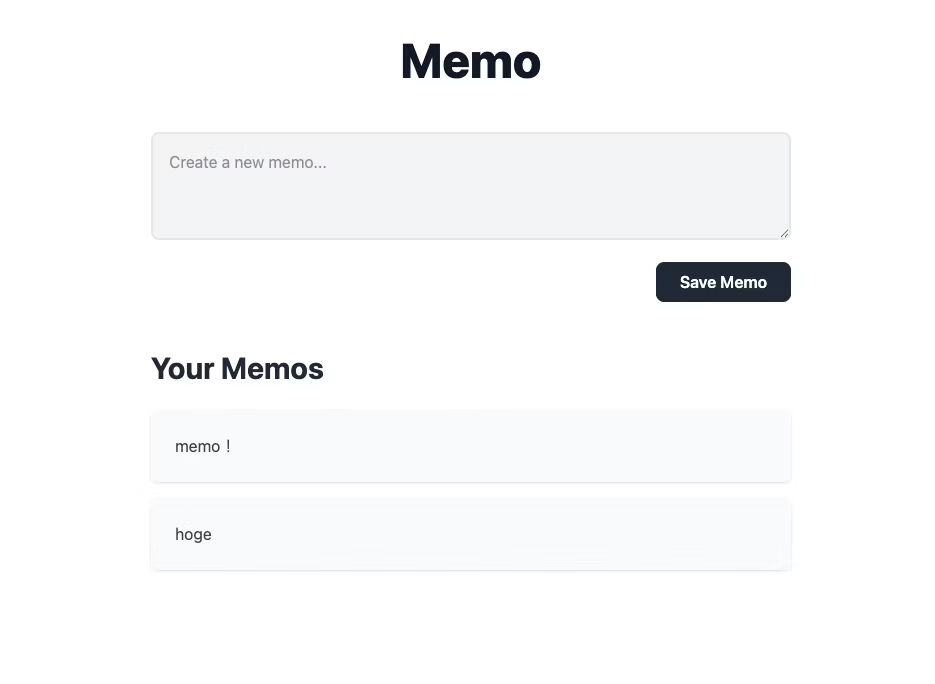
It looks like this and is OK! The content you enter will now be added to the list below. However, since this is just a JavaScript event, the list will disappear if you reload.
We use a database to store your input!
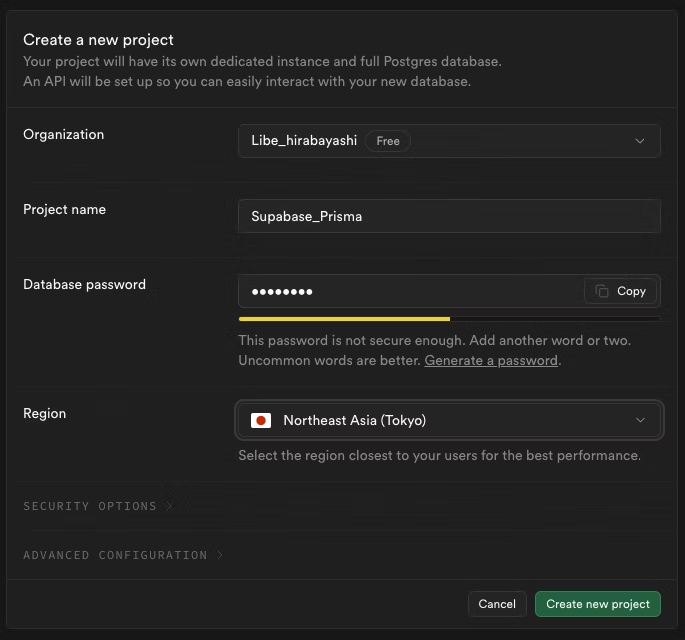
First, create a new project on the Supabase side.
Create a new project using the “New Project” button. Please note down the database password as you will need it when connecting with Prisma.
Next, connect Prisma.
npm install prisma --save-dev

npx prisma init
Entering these commands will install Prisma and create a Prisma folder.
Replace the DATABASE_URL in the .env file with the Supabase connection URL. Replace [YOUR-PASSWORD] with the database password you set in Supabase.
DATABASE_URL="postgresql://postgres.odoaingwnxkhkeujwhtp:[YOUR-PASSWORD]@aws-1-ap-northeast-1.pooler.supabase.com:5432/postgres"
Then/prisma/schema.prismaThe schema (database structure definition) is written in .
generator client {
  provider = "prisma-client-js"
}

datasource db {
  provider = "postgresql"
  url      = env("DATABASE_URL")
}

model Memo {
  id        Int      @id @default(autoincrement())
  content   String
  createdAt DateTime @default(now())
}
Model ○○ can be named as you like.
Once you have written the schema, you can migrate it.
npx prisma migrate dev --name init
A migration.sql file will be generated and data tables will be created on the Supabase side.
Creating an API to connect to Supabase
Create a connection API to save the entered values to Supabase.
Install Prisma Client in your project.
npm install @prisma/client
Connecting to Supabase
/libs/prisma.ts
import { PrismaClient } from "@prisma/client";

const Prisma = new PrismaClient(); //インスタンス化

export const main = async () => {
  try {
    await Prisma.$connect();
  } catch (error) {
    return Error("DB接続に失敗しました");
  }
};
API
/api/memos/route.ts
import { NextResponse } from "next/server";
import { prisma } from '@/lib/prisma';

export const GET = async (req: Request, res: NextResponse) => {
  try {
    await main();
    const memos = await Prisma.memo.findMany();
    return NextResponse.json(memos);
  } catch (error) {
    return NextResponse.json("エラーが発生しました");
  } finally {
    await Prisma.$disconnect();
  }
};

export const POST = async (req: Request, res: NextResponse) => {
  const { content } = await req.json();
  try {
    await main();
    const memos = await Prisma.memo.**create**({
      data: {
        content: content,
      },
    });
    return NextResponse.json(memos);
  } catch (error) {
    return NextResponse.json("エラーが発生しました");
  } finally {
    await Prisma.$disconnect();
  }
};
The GET function is an API that retrieves all records from the database, and the findMany() method retrieves all records that match the conditions. "memo" in Prisma.memo.findMany() is the schema name.
The POST function is an API that adds data to the database, and is created using create().
There are also other methods such as delete and update, so even if you cannot write SQL statements, you can operate it in the same way as JavaScript.
Here, we have everything ready.
All you have to do is bring the API you wrote earlier into page.tsx and incorporate it.
'use client';

import React, { useState, useEffect } from 'react';

interface Memo {
  id: number;
  content: string;
  createdAt: string;
}

export default function MemoApp() {
  const [memos, setMemos] = useState<Memo[]>([]);
  const [newMemo, setNewMemo] = useState('');

  const fetchMemos = async () => {
    const response = await fetch('/api/memos');
    const data = await response.json();
    setMemos(data);
  };

  useEffect(() => {
    fetchMemos();
  }, []);

  const handleSaveMemo = async (e: React.FormEvent) => {
    e.preventDefault();
    if (newMemo.trim() !== '') {
      await fetch('/api/memos', {
        method: 'POST',
        headers: {
          'Content-Type': 'application/json',
        },
        body: JSON.stringify({ content: newMemo }),
      });
      setNewMemo('');
      fetchMemos();
    }
  };

  return (
    <div className="bg-white min-h-screen">
      <div className="max-w-2xl mx-auto px-4 py-16">
        <header className="text-center mb-12">
          <h1 className="text-5xl font-extrabold text-gray-900">Memo</h1>
        </header>

        <main>
          <div className="mb-12">
            <form onSubmit={handleSaveMemo}>
              <textarea
                className="w-full p-4 text-gray-800 bg-gray-100 rounded-lg border-2 border-gray-200 focus:outline-none focus:ring-2 focus:ring-gray-400 focus:border-transparent transition"
                placeholder="Create a new memo..."
                rows={3}
                value={newMemo}
                onChange={(e) => setNewMemo(e.target.value)}
              ></textarea>
              <div className="flex justify-end mt-4">
                <button
                  type="submit"
                  className="px-6 py-2 bg-gray-800 text-white font-semibold rounded-lg hover:bg-gray-900 transition"
                >
                  Save Memo
                </button>
              </div>
            </form>
          </div>

          <section>
            <h2 className="text-3xl font-bold text-gray-800 mb-6">Your Memos</h2>
            <div className="space-y-4">
              {memos.length > 0 ? (
                memos.map((memo) => (
                  <div key={memo.id} className="bg-gray-50 p-6 rounded-lg shadow-sm">
                    <p className="text-gray-700">{memo.content}</p>
                  </div>
                ))
              ) : (
                <div className="text-center text-gray-500">
                  <p>No memos yet. Add one above!</p>
                </div>
              )}
            </div>
          </section>
        </main>
      </div>
    </div>
  );
}
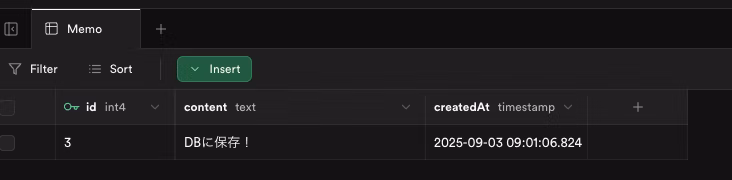
It's saved on the Supabase side!
This time, I relied on Gemini to create a rough outline, but if I could use a database to save values, the range of functions and apps I could create would be wider!
I had a preconceived notion that the backend would be difficult, but being able to manage the database with a GUI tool was easy to understand, and it lowered the barrier to database integration!
Yay!


I develop front-end projects using JavaScript, React, and Next.js, focusing on markup. I feel happy when a site I've worked on is successfully published! My hobby is playing the guitar. I enjoy both writing and playing code!
Hiratchi
Front-end engineer / Joined in 2022