.png?fit=crop&w=1280&h=560&fm=avif)
上次我们以「使用 Google Form 创建客户表单时的陷阱」为题,总结了在使用 Google Form 的 HTML 自定义功能创建咨询表单时遇到的问题。本次我们将介绍确认页面的实现方法。
在上个项目中,
输入页面→提交完成页面→自动发送确认邮件
的实现。
本次,
输入页面→输入确认页面→提交完成页面→自动发送确认邮件
的确认页面实现进行总结。
结论:仅使用 Google Form 无法实现「插入确认页面」
Google Form 无法通过 JavaScript 自由控制表单提交内容的处理或页面跳转(出于安全考虑,表单内部无法通过 JS 访问)。
Google Form
- 本身就无法设计提交前的中间确认画面。
- 也无法将输入中的数据发送到其他页面,或将其嵌入到 HTML 中。
因此,自定义 HTML 表单 + GAS Web 应用成为必需。
使用 GAS Web 应用时,需要用 HTML 和 GAS 组合,而不是 Google Form。由于想用 Google Form 创建咨询表单,决定向 Gemini 请教。
.png)
能否将静态页面(index.html)中输入的数据传递给确认页面(confirm.html),然后通过 将该页面的数据关联到 Google Form?

这是个敏锐的想法,但遗憾的是这种方法原则上「几乎不可能」实现。 如果一定要这样做 ①index.html → 用 JavaScript 将表单输入的值保存到 sessionStorage。 ②confirm.html 中从 sessionStorage 读取值并显示。 ③使用 向 Google Form 的 formResponse 发送 POST(使用 entry.xxxxx 进行自定义) 但请注意,这种方法并非 formResponse 的官方做法,且对禁用 JavaScript 的用户无法运行,存在这些缺点。
加上 JavaScript 实现!
那么让我们来看一下利用 JavaScript 的实现方法。
①index.html:创建输入页面
首先,在输入页面创建联系表单。此时不输入 Google Form 的 entry.xxxx 值。
<form id="form">
  <input type="text" name="category" placeholder="お問い合わせ種類">
  <input type="text" name="name" placeholder="お名前">
  <input type="email" name="email" placeholder="メールアドレス">
  <button type="submit">確認</button>
</form>

<script>
  document.getElementById('form').addEventListener('submit', function (e) {
    e.preventDefault();
    const formData = new FormData(e.target);
    for (const [key, value] of formData.entries()) {
      sessionStorage.setItem(key, value); // sessionStorage に保存
    }
    window.location.href = '/inquiry/confirm.html';
  });
</script>
点击确认按钮后,用 JavaScript 将表单输入的值保存到 sessionStorage,然后跳转到确认页面 /inquiry/confirm.html。
②confirm.html:创建确认页面
将保存在 sessionStorage 中的值输入到 class="confirmBlock"。
然后在其下方的表单中输入 Google Form 的 entry.xxxxx 值。
<div class="confirmBlock">
  <p>お問い合わせ種類: <span id="category"></span></p>
  <p>お名前: <span id="name"></span></p>
  <p>メールアドレス: <span id="email"></span></p>
</div>

<form action="<https://docs.google.com/forms/d/e/1FAIpQLSc-.../formResponse>"
      method="POST" target="hidden_iframe" onsubmit="submitted = true;">
  <input type="hidden" name="entry.1234567890" id="categoryInput">
  <input type="hidden" name="entry.2345678901" id="nameInput">
  <input type="hidden" name="entry.3456789012" id="emailInput">
  <button type="submit">送信</button>
</form>

<iframe name="hidden_iframe" style="display:none;" onload="if(submitted) window.location='/inquiry/complete.html';"></iframe>

<script>
  // 表示とフォームへの挿入
  ['category', 'name', 'email'].forEach(key => {
    const value = sessionStorage.getItem(key);
    document.getElementById(key).textContent = value;
    document.getElementById(key + 'Input').value = value;
  });

  let submitted = false;
</script>
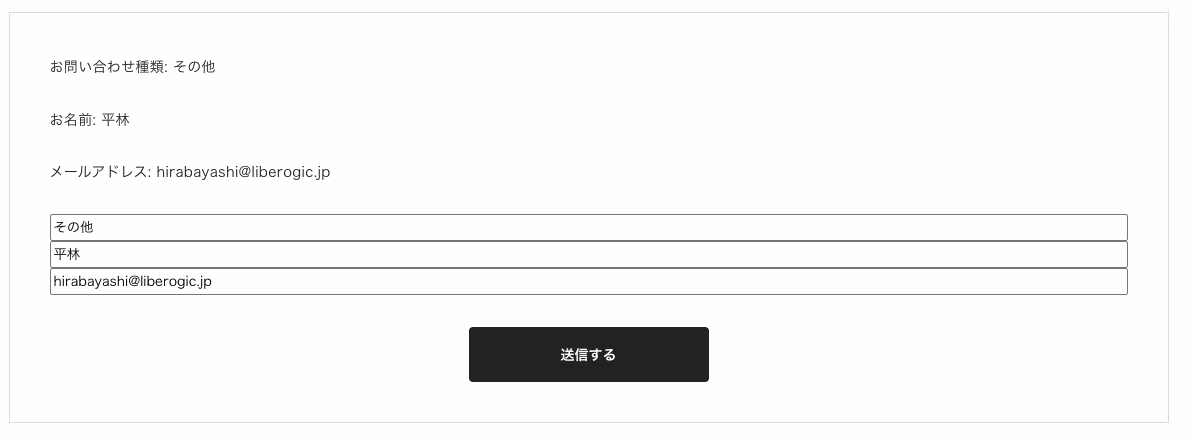
为什么要在确认页面上放置输入表单呢…
这是因为我们需要用这个表单来激活 Google Form 的 formResponse!
用 type="hidden" 将表单本身隐藏。
实际的确认页面如下

如果移除type="hidden",这里会出现一个自定义的 Google Form!
当点击发送按钮时
<iframe name="hidden_iframe" style="display:none;" onload="if(submitted) window.location='/inquiry/complete.html';"></iframe>
转移到完成页面 complete.html 就可以了!
流程是将在index.html中输入的值传递给confirm.html中的Google表单,然后进行提交。
因为是可定制的 Google Form,所以既可以使用汇总电子表格,也可以通过 GAS 发送自动回复邮件。
总结
单独使用 Google 表单难以实现的"确认页面",只要利用 JavaScript 就可以灵活地实现。※不过代码确实是完全可见的呢💦
只需稍作自定义调整,就能大幅提升外观和易用性,不妨花点心思来优化一下呢。


我主要从事以标记语言为中心,使用JavaScript、React、Next.js进行前端开发的工作。当我参与的网站顺利发布时,我会感到很高兴!我的爱好是弹吉他。喜欢猫和烤红薯🐱🍠
Hiratch
前端工程师 / 2022年入职